Section L (26/12/08 )
WHEELS, TYRES AND JACKING
L.1 Tyre care and maintenance
L.2 Punctures
L.3 Changing a wheel
L.4 Front wheel and wheel bearings
L.5 Tyre precautions
L.6 Car jack
|
|
||
|
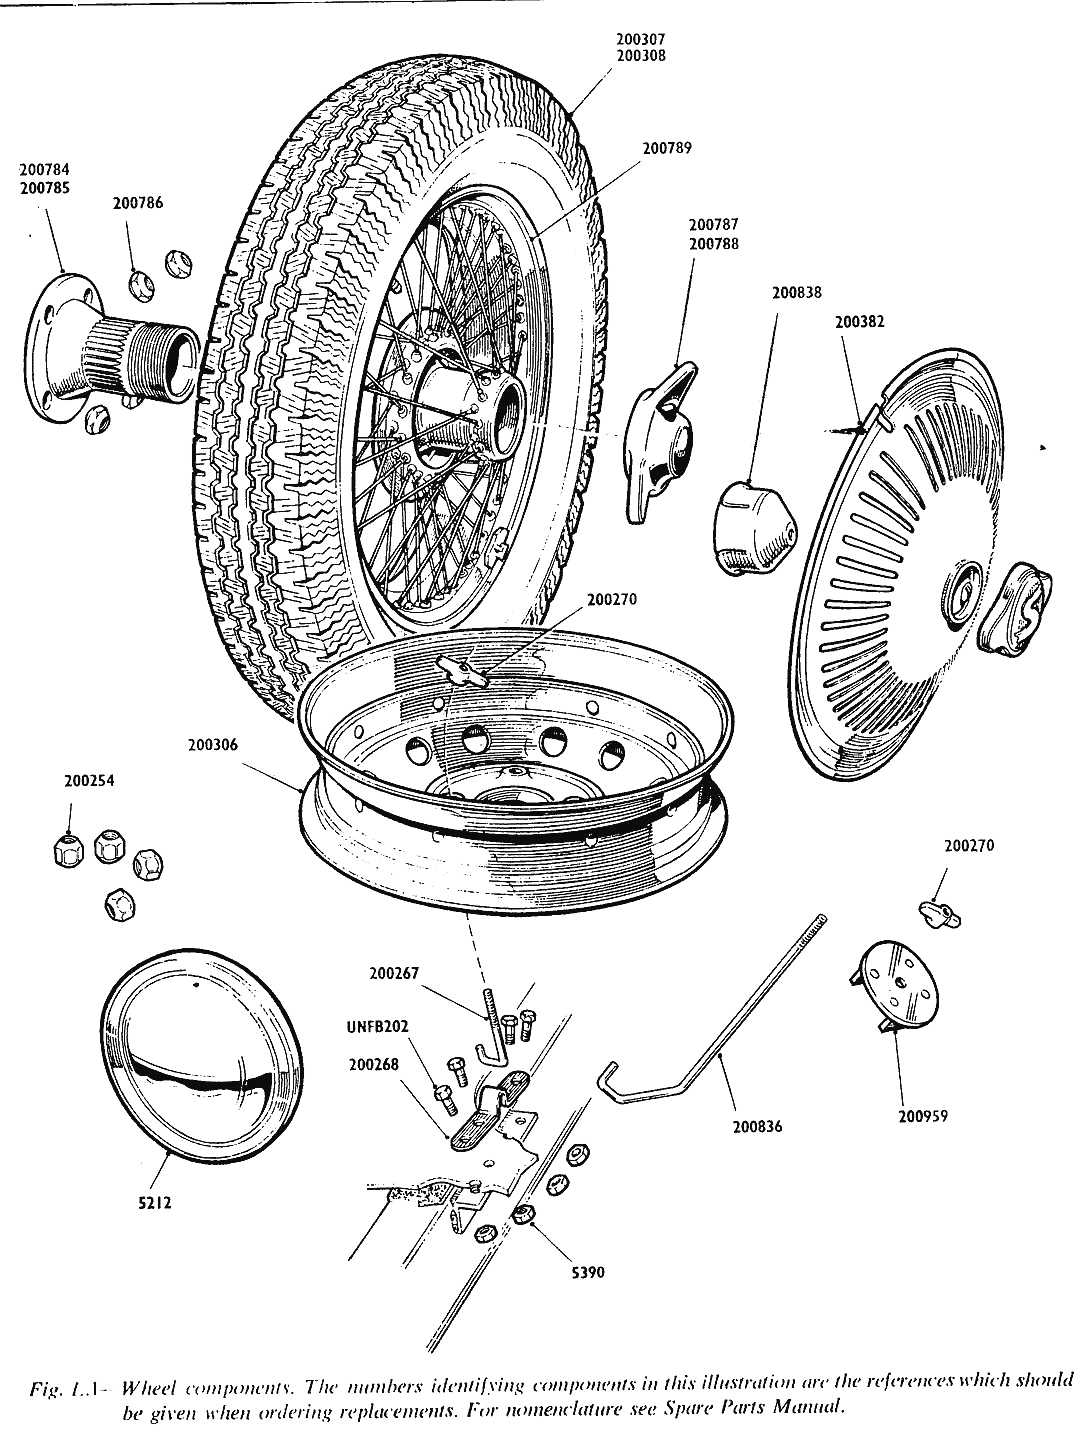
L1 TYRE CARE AND MAINTENANCE The four road wheels are the bolted type 4J x 15m fitted with 155 x 15 Pirelli Cintura sports tyres. Systematic and correct tyre maintenance is important for the road-worthiness of the vehicle. Tyres must be able to sustain the weight of a loaded vehicle and the tyre pressures should be checked at least once a week. Much harm can be done to the vehicle and its tyres by failure to inspect the tyres regularly for correct inflation. Tyre Pressure: Front 21 lb Rear 21 lb For hard driving and prolonged high speeds: Front 21 lb Rear 23 lb The tyres fitted are the conventional tubed type and renewal is easily effected by pressing the tyre head into the wall and at the same time, drawing the opposite side over the rim by means of a tyre lever. Ensure that the tube is fully deflated and that the tyre head is not adhering to the wheel rim. Whenever possible use tyres which have a moulded line for accuracy of fitting. If the tyre is correctly mounted the line will be equidistant from the rim al points. In order to equalise tyre wear it is recommended that
the wheels are periodically changed round in the following sequence: Tyres should be regularly inspected and all embedded objects such as glass, nails etc.. removed before they work through and penetrate the tube. lt is essential that oil (paraffin particularly) and grease should not be allowed to collect on the garage floor, as their presenee is injurious to rubber. Should oil be discovered, remove with petrol moistened cloth. L2 PUNCTURES Replacement, using the spare wheel is the usual and most convenient method for overcoming punctures. There are, however, instances when a spare wheel is not readily available, and repair is effected by using a repair outfit. If a puncture is suspected, check for air leakage by immersing the inflated tube in water, marking the position of the leak. Having defined the damaged area, the puncture can then be mended, provided that the instructions on the repair outfit are followed.
|
L3 CHANGING A WHEEL Make sure the handbrake is fully on and, as an additional precaution place a chock under one of the wheels. To remove the front wheel place the jack under the centre of the front cross member, jack up, remove the wheel cap using a screwdriver to prise it frons the wheel. Unscrew the four conical-ended nuts securing the wheel to the front hub with the wheel brace supplied in the tool kit. Remove the rear wheels as outlined above, but the jack must be positioned under the main chassis member. After jacking the vehicle down, and before removing the jack, make a final check on the tightness. A similar check should be made after the first 300 miles. When replacing a wheel it should be noted that the conical end of the nuts screw on to the stud first and all threads are right-hand. Each nut should be tightened alternately otherwise the wheel may not run true. In the case of wire wheels the removal and replacement is as follows:
|
|
|
Use a leather mallet or similar tool to slacken the winged hub nut which secures the wheel to its splined shaft and carefully withdraw the wheel. The replacement of the wire wheel is the reverse of the procedure out-lined above making sure that the splines are well greased and hub nuts secure. Note. ---The right-hand hub caps have a left-hand or anti-clockwise tbread and care should be taken when removing or replacing wheels to ensure that the hub caps are not accidently over tightened or slickened by hammer blows on the wrong wing of the cap. L4 FRONT WHEEL AND WHEEL BEARINGS The front wheels are mounted on tapered roller bearings. and after approximately 5.000 miles, bearing lubriecation is advisable. It may also he necessary to adjust the bearings. To test them. jack-up, and grasp the wheel at the top and bottom of the tyre and rock it to and fro. Do not be confused by any possible looseness which may exist in various steering connections. If excessive play exists the bearings should be adjusted. To Adjust Remove the wheel and prise off the Domed Dust Cap. Withdraw the split pin which secures the castellated nut and unscrew. Remove the thrustwasher and tapered roller bearings, thorougbly clean these components and regrease. For full dismantling. Re-assembly and Lubrication details see the section devoted to Front hub ad Suspension. |
Replace the bearing followed by the tbrust 'D' washer and castelated nut. Tighten the nut, at the same time rotating the wheels-, continue tightening until heavy wheel drag is felt. Then turn back the nut one flat at a time until the wheel is perfectly free. with just perceptible float. This can best be determined with the wheel in position. Fit new split pin and replace the domed cap.
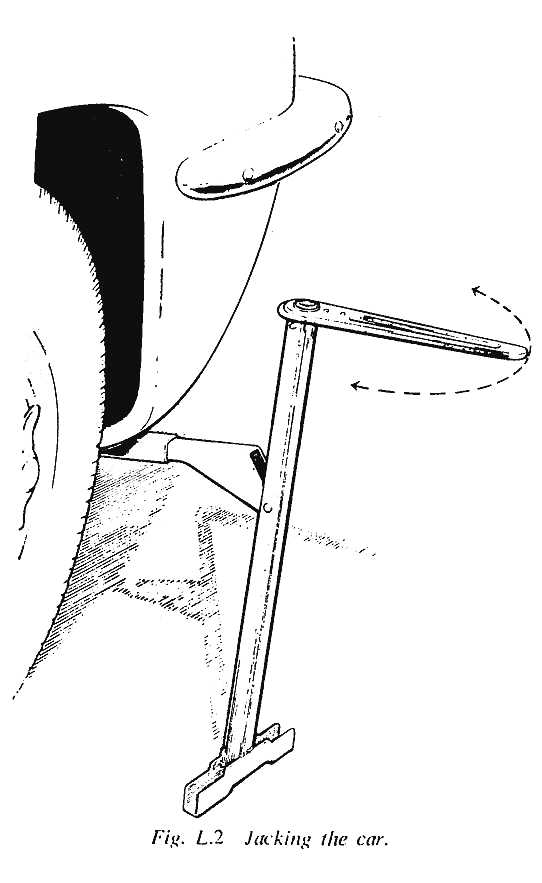
L5 TYRE PRECAUTIONS The following precautions should be taken to ensure maximum tyre life: 1. Avoid under or over-inflation. 2. Avoid sudden stops or fierce acceleration. 3. Avoid high speeds. particularly when cornering. 4. Avoid kerbing and other causes of impact. 5. Change tyres round regularly. 6. Keep brakes correctly adjusted. 7. Keep the tyres clear of oil and paraffin L6 CARJACK A 'Shelley' car jack is supplied with every vehicle. The bonnet must first be raised to give access to the front jacking points. The front suspension arms carry tunnels into which the toe of the jack arm is fitted. Operation of the ratchet jack wrench will then raise the car. To lift the rear of the car, the jack is fitted into the appropriate tunnel which is located under the lower edge of the rear wing. See Fig. 1. To lift the car the ratchet wrench is turned clockwise, to lower, anticlockwise. |
|